This page aims to provide a user-friendly guide to the desktop version of the corpus analysis software that was developed for the Genealogies of Knowledge project.
Note: To access a user manual for the web-version of the corpus tool (currently for use with our Modern English and Internet English subcorpora only), please visit: https://www.shecorpus.net/user-manual-web-interface/
Information about the content of our corpora can be accessed here.
For suggestions as to the kinds of research that might be conducted using these new tools, please see the Research Avenues section of the website.
Should you encounter any software bugs or other technical problems when using these tools, please create a ticket detailing the nature of the issue on our SourceForge project page: https://sourceforge.net/p/modnlp/tickets/
Table of contents
- Concordance Browser
- Search options:
- Sort
- Extract
- Metadata
- Delete Line
- Subcorpus Selection
- Quick Load Facility
- Options and Preferences
- Plugins:
- Using the Greek Corpus
- Using the Arabic Corpus
Concordance Browser
Once you have downloaded and launched the software, a screen similar to the one shown below will be presented:
![]()
Click on ‘File’ to choose the language corpus you wish to work with. ‘English’ is the default corpus unless you choose another corpus from the drop-down menu. For more information about the content and design of each of the corpora, please click here.
It is also possible to access other remote corpora via the Genealogies interface. For example, in order to access the Translational English Corpus (TEC), go to ‘File’->’New remote corpus…’ and enter genealogiesofknowledge.net:1240 as the IP address of the new corpus server.
The ‘Options’ menu allows you to make a number of choices relating to how you access the corpora. ‘Plugins’, on the other hand, are additional tools (mostly tools of analysis) which facilitate working with the corpus and provide further information on the texts, such as frequency lists and details about the content of each corpus. All of these features are explained below.
A keyword search will populate the concordance browser window, displaying the Filename, Left Context, Keyword and Right Context for each line of text in the corpus that matches this search string.
The width of each column can then be adjusted manually by clicking and dragging the divider bars separating each column header. This is often useful when working with unusually long or short keywords.
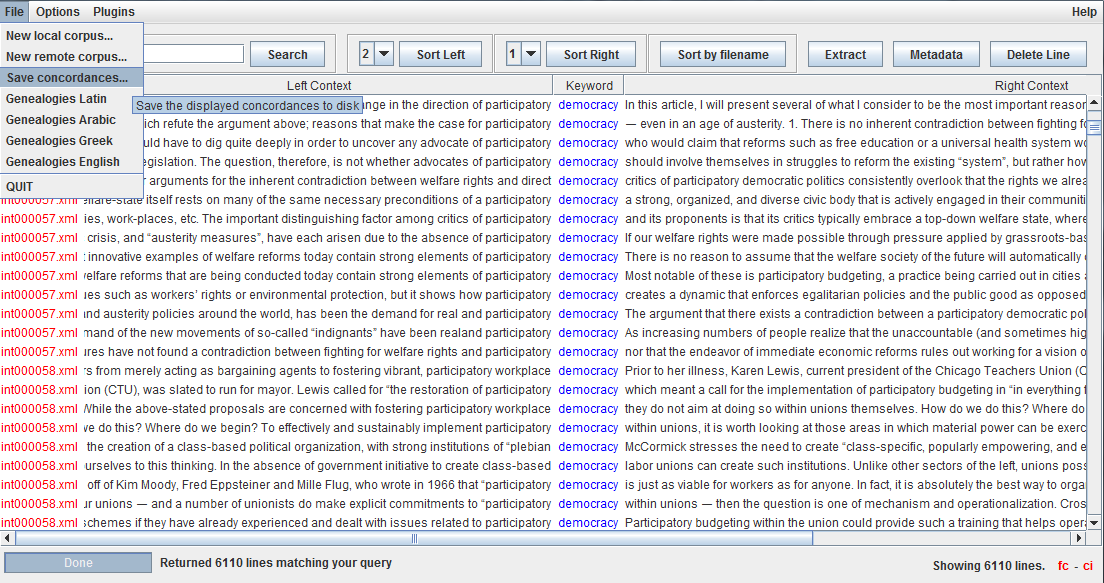
The total number of ‘hits’ for a search query is displayed at the foot of the corpus browser window. In the screenshot below, for example, the software tells us that there are 6110 instances of the keyword democracy in the corpus selected.

Individual concordances can be saved to your computer as a CSV file via the ‘File’ menu (‘File->Save concordances…’). This can be imported into a spreadsheet and manipulated using software such as Microsoft Excel.
Search options
Note: The following description of search options is based on using the Genealogies English corpus. Because Latin shares the same script, the description will also be relevant to the use of the Latin corpus. In order to view more specific information on using the Greek and Arabic corpora, please click on the links below:
Single Keywords
Single keywords may be typed into the search bar to retrieve a concordance of all lines in the corpus containing the keyword.
The search function is by default not case-sensitive so a search for democracy will retrieve both democracy and Democracy. In order to make a search case-sensitive, click ‘Options->Case sensitive’.
Wildcards
The * symbol may be used to represent any string of characters of any length. For example, searching test* will retrieve a concordance containing all words which start with test (e.g. test, tests, testament, testability, etc):

Sequences
You can also specify sequences of keywords and/or wildcards, and the maximum number of intervening words you wish to allow between each element in the sequence.
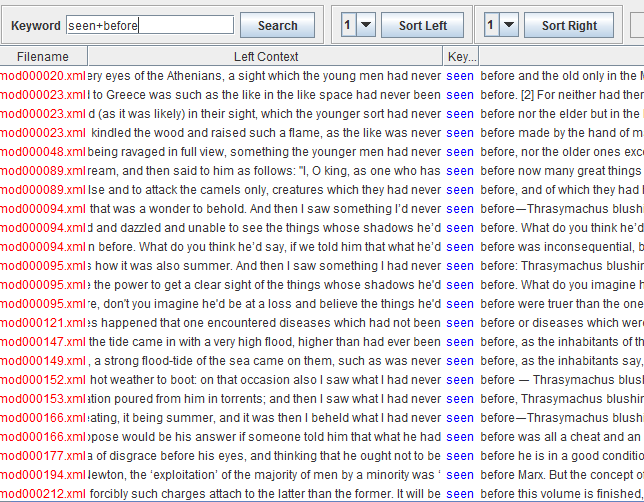
For example, entering seen+before will return every instance in which these two words appear next to one another (and in this order):
Entering seen+[1]before finds, in addition, …seen her before…, …seen him before…, i.e., all sequences in which there is at most one word between ‘seen’ and ‘before’:

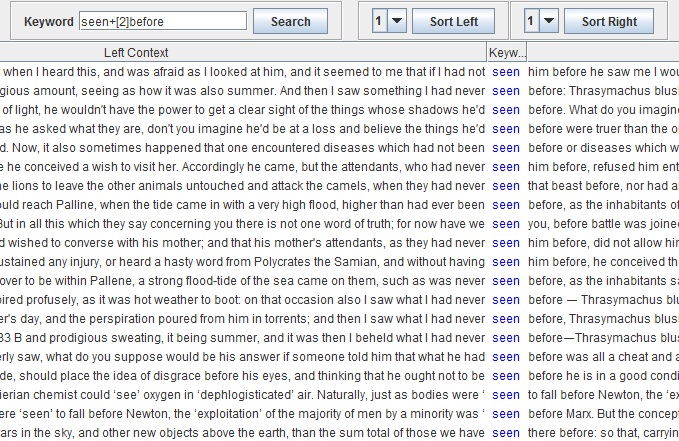
Entering seen+[2]before finds, in addition, …seen to fall before…, and all sequences in which there is at most two words between ‘seen’ and ‘before’:
Combinations of words and wildcards are also allowed in sequences, so entering know+before* will find …know before…, …know beforehand…, etc.
Using sequences to find exact combinations of keywords is possible and wildcards can be used to find patterns with an exact number of intervening words. However, these queries will take a long time to run.
An example query of good+man+*+bad finds the concordance shown below.

Regular expressions
Finally, searching using ‘regular expressions’ allows you to select any string that matches a specified element of regular language. Regular expressions need to be enclosed in double quotation symbols (e.g. “regex”). A selection of example ‘regex’ searches are shown below:
- “(man|men)” retrieves a concordance of lines containing EITHER man OR men (i.e. the vertical bar is used to separate alternatives; the set of alternatives must be placed within parentheses);
- democracy+”(is|as|means)” retrieves a concordance of sequences containing democracy AND EITHER is OR as OR means;
- “labou?r” retrieves a concordance of labour AND labor (i.e. the question mark is used to indicate that the ‘u’ in this search string is optional);
- “citizens?(hip)?” finds instances of citizen, optionally followed by an ‘s’ AND optionally followed by ‘hip’ (i.e. the parentheses group the characters in ‘hip’ together as a suffix that can be treated as optional. This regex can thus be used to generate a concordance of citizen AND citizens AND citizenship);
- “pl…” retrieves a concordance of all five-letter words beginning with ‘pl’ contained in the corpus (i.e. the full stop is used here to indicate any single character, not including white space).
- “dem.{2,7}” returns a concordance of all words starting with ‘dem’ followed by a minimum of two characters and a maximum of seven characters (i.e. the curly braces {} are used in combination with the full stop to indicate a minimum and maximum number of characters {min,max}).
A brief guide to regular expression syntax is also available here.
Sort
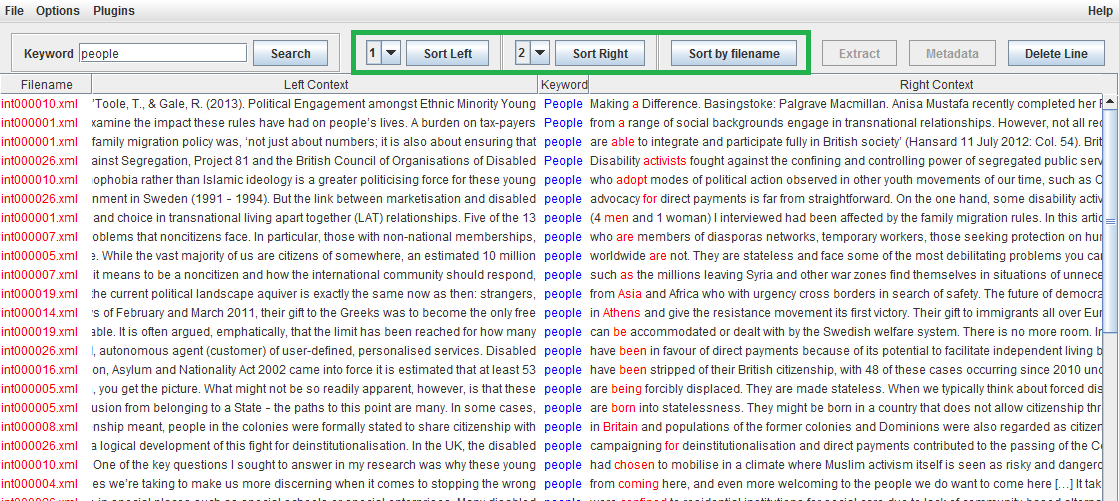
Searched concordances can be sorted at a position relative to the keyword. Select the position using the dropdown menus for either the right or left context, and click the corresponding sort button to reorganise the concordance list. The words at the sorted position will be highlighted in red.
If you use a wild card you may find it useful to sort concordances by the keyword in order to see each variant (e.g. practice, practiced, practices, practice-based) in one block. This can be done by selecting position zero on either the right or left context.
By clicking ‘Sort by Filename’, the concordance lines can also be grouped according to the different texts from which they have been extracted.
Extract
Clicking on a concordance line and then pressing the ‘Extract’ button will bring up a window containing an expanded context for that concordance line, as shown below:

Metadata
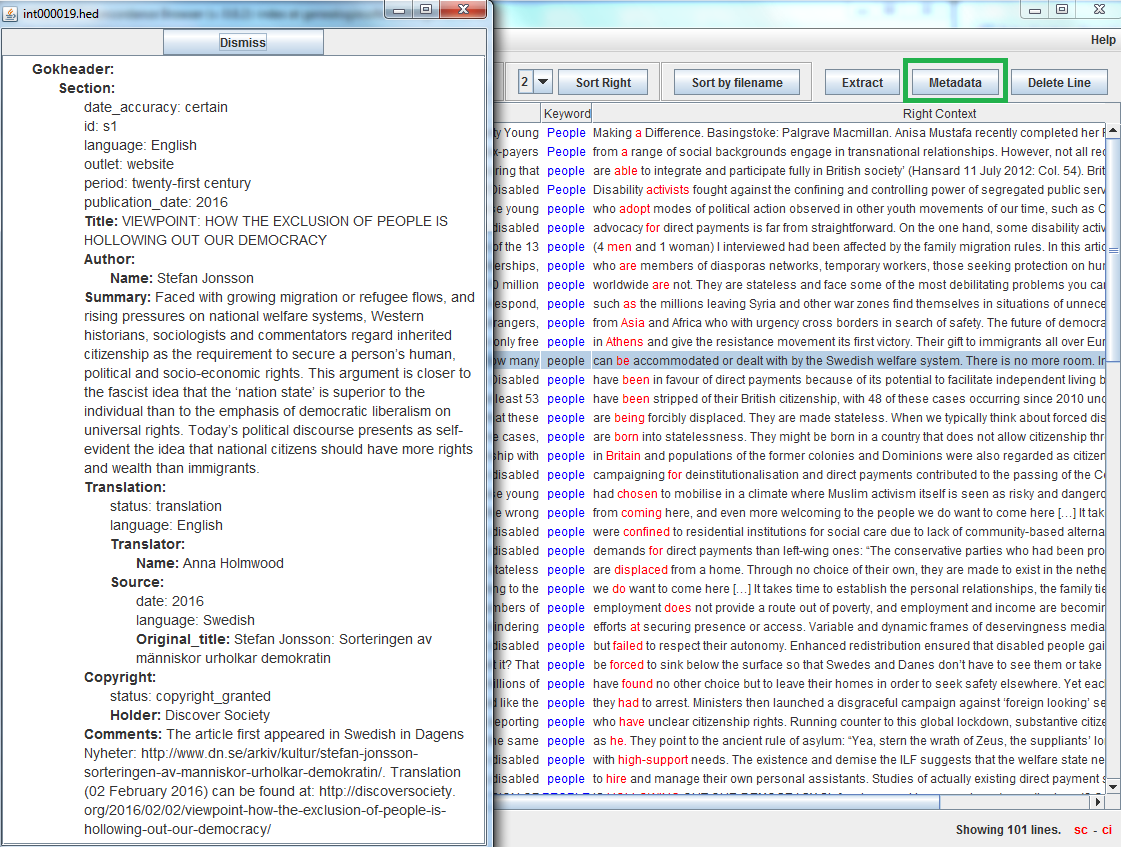
Clicking on a concordance line and then pressing the ‘Metadata’ button will bring up a window containing metadata for the file which contains that concordance line, as shown below:
Delete Line
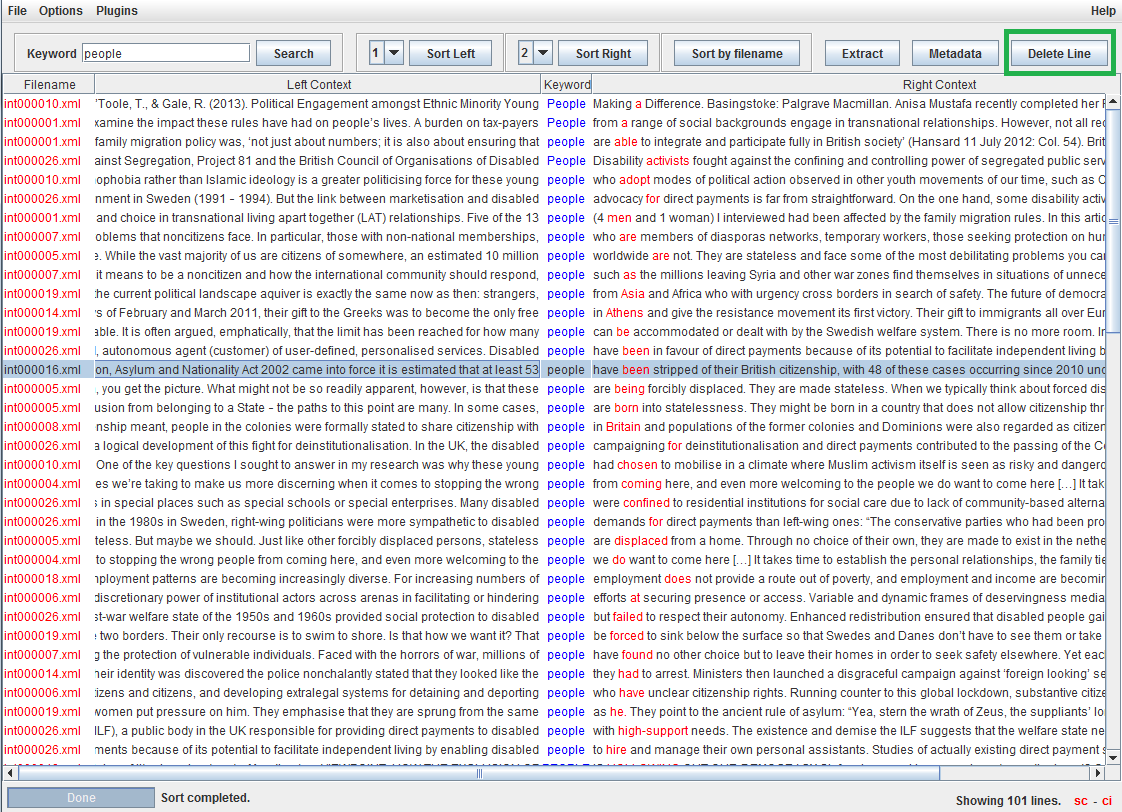
Selecting a concordance line and then clicking on the ‘Delete Line’ button will remove this line from the concordance. You can also select and delete a block of consecutive lines. This can be a useful feature if you wish to declutter the display in order to focus in on a particular collocation or set of collocations.
Running the same search again will bring any deleted lines back into the concordance displayed.
Subcorpus Selection
The subcorpus selection tool allows you to restrict the results of concordance queries and the contents of frequency tables to files matching certain criteria. These criteria can be, for example, the subcorpus (e.g. Internet or Modern subcorpus) to which they belong, their publication date, the author, the translator, etc..
In order to select a subcorpus, choose ‘Sub-corpus->Sub-corpus Tool…’
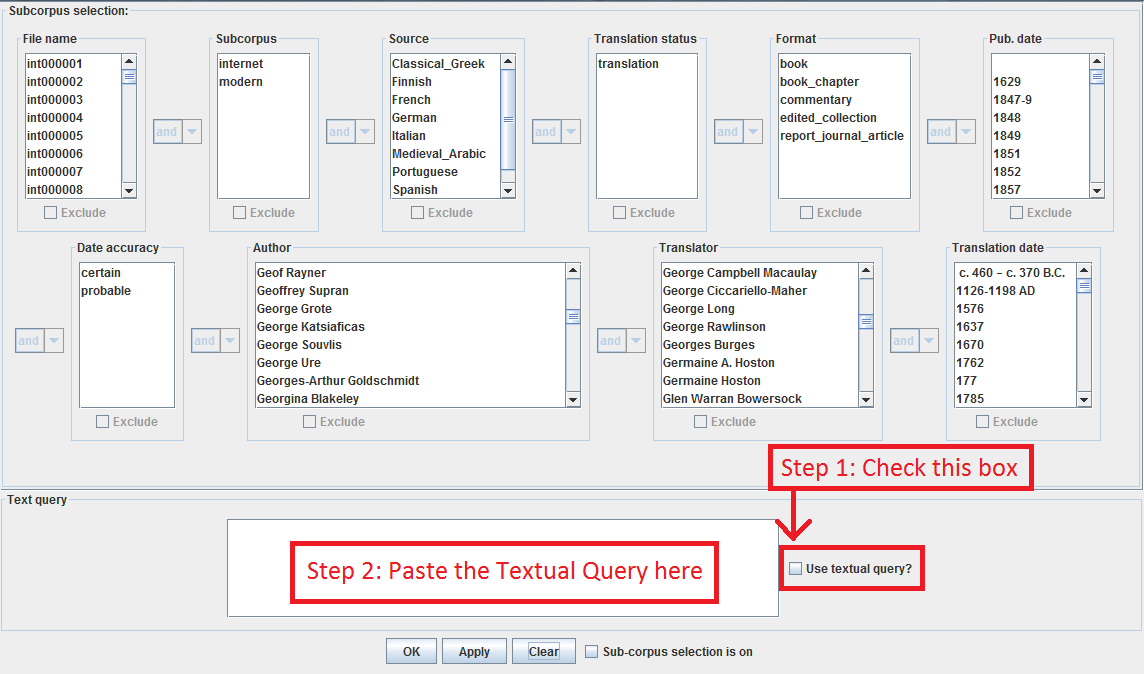
A window with multiple selection options should occur. If no selection blocks are on display immediately, please drag down the bar above the text query box to reveal a window like the below:
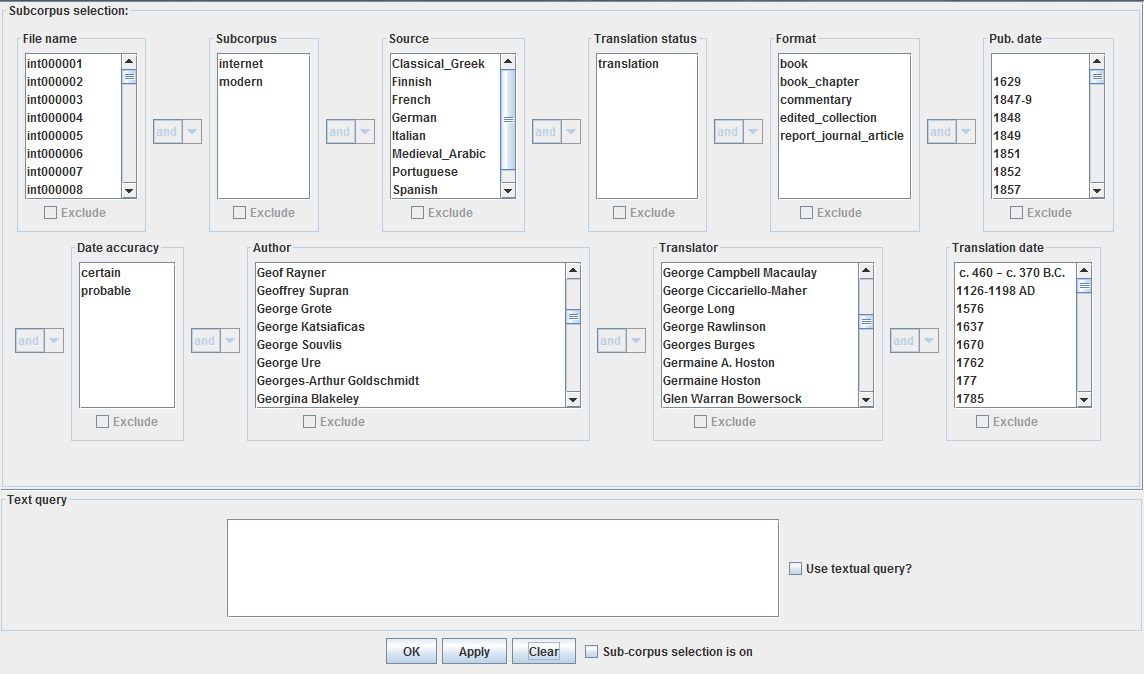
The menu boxes allow you to select one or more parameters for texts to be included in or excluded from the desired subcorpus. Please notice the scroll bars that can be used to display the full range of items to select from. In order to select more than one item (e.g. a range of dates) within a single menu box, hold the CTRL key on your keyboard (CMD on Apple computers) as you click on each.
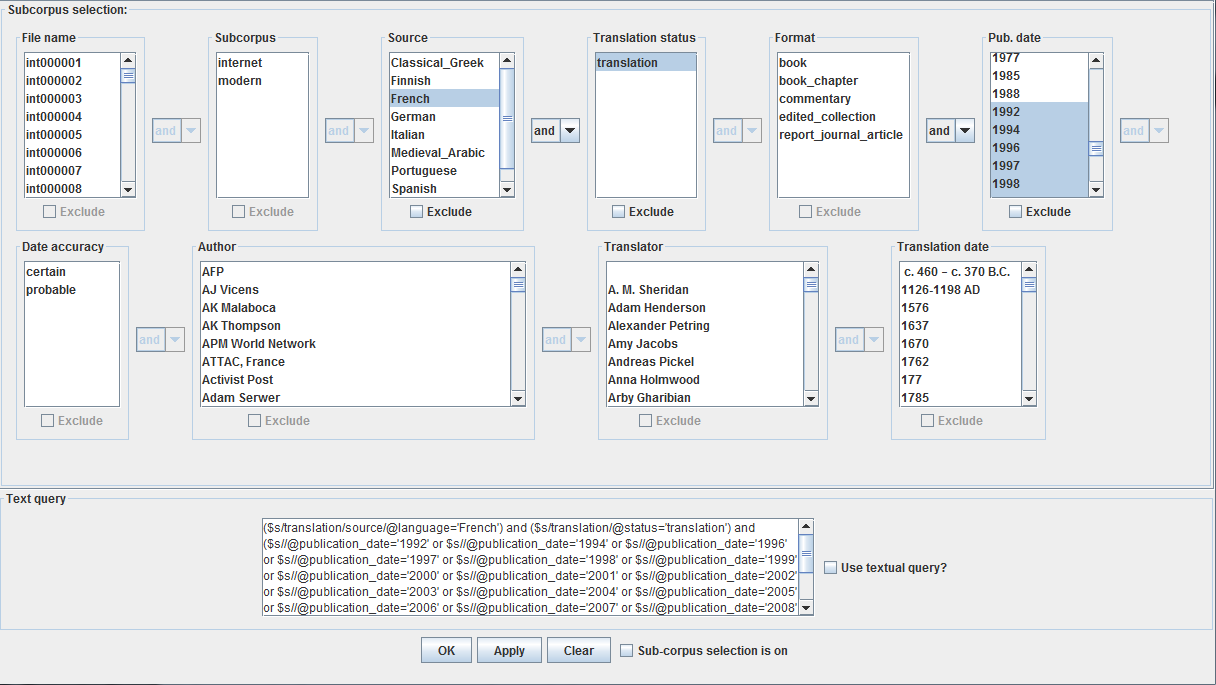
Criteria in multiple menu boxes can also be connected so as to form the logical expressions which ultimately determine what gets included or excluded. You can, for example, choose a subcorpus of translations from French published after 1990 by selecting each of these criteria within the interface:
By default, selecting an item in the menu boxes will include files that meet this criterion in the subcorpus; in order to exclude certain texts from your subcorpus selection, select the relevant criterion and tick the ‘Exclude’ checkbox below this menu.
For example, if you want to run a search on only the translated texts contained in the corpus (i.e. no original writings), you should select ‘Translation’ within the ‘Translation status’ menu box. This will include only those texts that have been tagged as translations in their metadata within your subcorpus selection. If, on the other hand, you want to run a search on non-translated works only, you should instead select ‘Translation’ within the ‘Translation status’ menu box and tick the ‘Exclude’ checkbox below this menu.
Clicking ‘Apply’ and then ‘OK’ activates the subcorpus selection. In order to de-activate it (that is, allow a search on the full corpus or another subcorpus), choose ‘Options’ and de-select ‘Activate subcorpus’.
Sometimes the information in the metadata will not be sufficient to define the required subcorpus. In this case, building the subcorpus manually by selecting the required filenames individually and saving the output as a textual query for reuse at a later time is recommended.
For example, you might be interested in some but not all of the translations produced of Thucydides History of the Peloponnesian War: e.g. Henry Dale’s (mod000098), Charles Smith’s (mod000016) and Stephen Lattimore’s (mod000048), but not Benjamin Jowett’s (mod000019) or Richard Crawley’s (mod000020). In this case, it might be easiest to select the appropriate filenames and save this query for later use:
($s/../document/@filename=’mod000098′ or $s/../document/@filename=’mod000016′ or $s/../document/@filename=’mod000048′)
To reuse a textual query such as this, simply tick the ‘Use Textual Query?’ checkbox and paste into the Textual Query box at the bottom of the Subcorpus Selection window.
Quick Load Facility
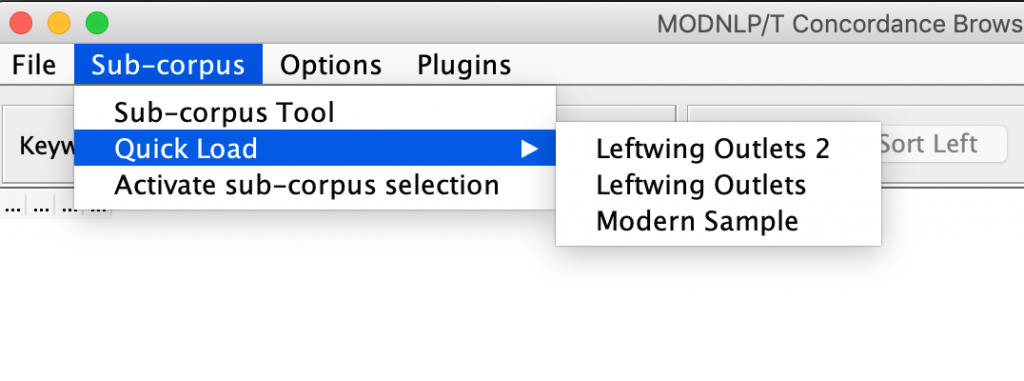
Another, easier way of saving your subcorpus selection for reuse at a later time is to give the selected subset of files a name and click either on Save Corpus (to save the output of the query for later use) or Save+Select Corpus (to save it for later use as well as select it for examination in the current session).

To retrieve the selection in a later session, go to Subcorpus > Quick Load and select the relevant subcorpus.
Note: The first time the Quick Load facility is used to reactivate a selected subcorpus in any given session the software can be a little slower to show the initial output of a search.
Note: Saving a corpus for later use saves the query, not the result. The corpora are still growing, and if any files are added that match your search (for instance, if you searched for a journal rather than a number of specific files), they will also be added to your Quick Load corpus selection. Therefore, if you are planning to conduct a study over an extended period of time, it is good practice to document which texts exactly you are working with, for instance by saving a copy of the corpus description browser.
The files you generate through this process will be saved on the machine you are currently using. If you want to be able to use them/call them up on a different machine, you can transfer them by following the steps below:
- On your current machine: Search for the folder GOKCache
- Inside this folder you should find a folder called namedCorpora
- Inside namedCorpora there will be numbered folders, each representing one of the language corpora. 0 represents the English corpus.
- The files within this folder are your saved subcorpora, and you can copy them over to the same place on another machine.
Note: You may need to create one saved subcorpus on the new machine to allow the interface to generate the folders you need to place the new files.
Options and Preferences
The preferences panel can be opened by selecting the menu option ‘Options->Preferences…’.
The following window should appear:
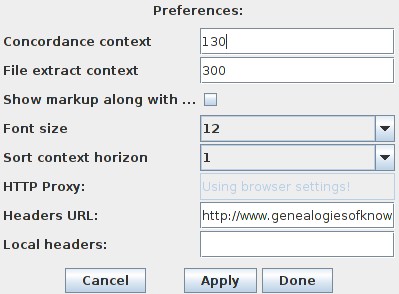
- Concordance context changes the number of characters displayed to the left and right of the keyword.
- File extract context changes the number of characters displayed in the ‘Extract’ window.
- Font Size changes the font size in the browser, extract and metadata windows.
Plugins
Several plugins have been developed to enhance corpus analysis. These plugins are mature prototypes and as such are under continued development:
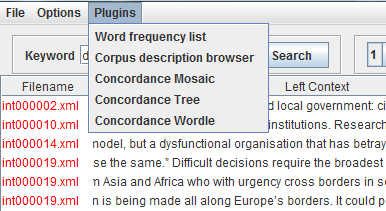
Frequency List
Select ‘Plugins->Word Frequency List’. The following window will appear:
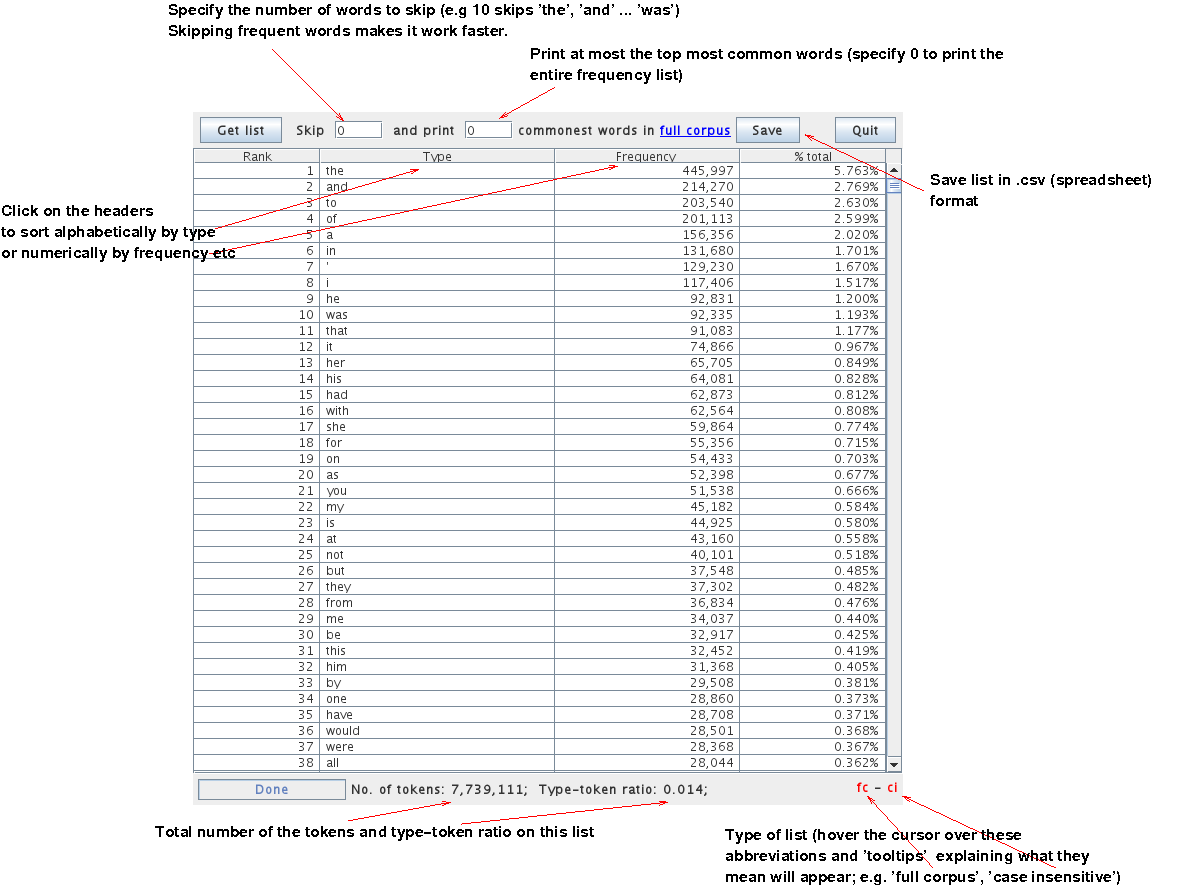
Select the range of ranked items to display (the default is to display the 500 most common terms) and click on ‘Get List’ to retrieve their frequency table. This table can be saved to a CSV file which you can manipulate through spreadsheet software or other external tools.
This list can also be sorted alphabetically or numerically by frequency within the window by clicking on the headers ‘Type’ and ‘Frequency’ respectively.
Note: as shown above, set 0 as the print option to retrieve the entire frequency list.
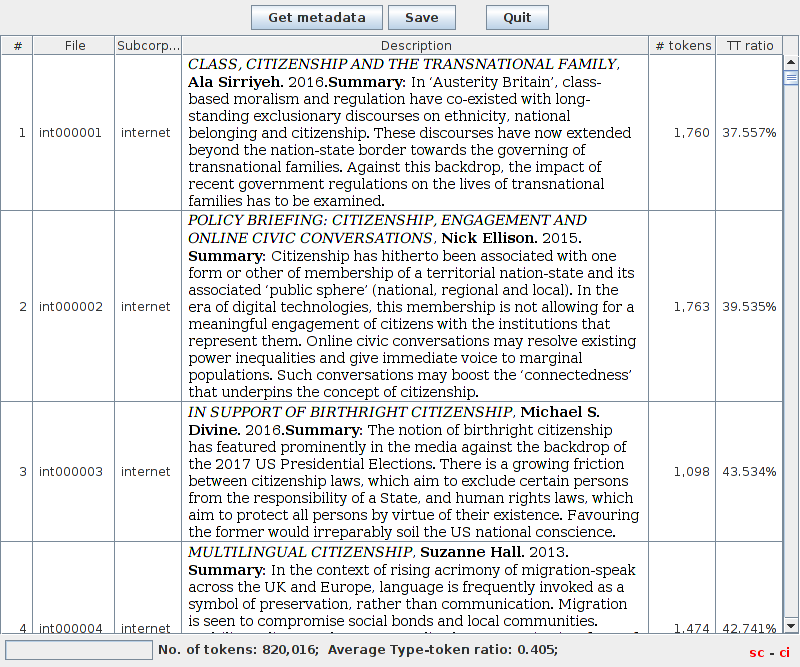
Corpus Description Browser
By selecting ‘Plugins->Corpus Description Browser’, a window will appear which contains a list of each file in the corpus or subcorpus selection. Also displayed is the metadata associated with these files, the number of tokens they contain and their type-token ratios.
At the bottom of the window you will see the total number of tokens in the corpus (or subcorpus selection) and the overall type-token ratio.
Mosaic Visualization
Unlike the Frequency List and Corpus Description Browser, the Mosaic and the Concordance Tree plugins generate positional word statistics based on a concordance you have already generated.
Within the Mosaic plugin, four modes of operation are available:
[A] Frequency Mosaic
This view shows word frequency at positions to the left and right of a keyword. Each box (tile) represents a different word at each position. The height of each box is directly proportional to its frequency.
For the example, in the Mosaic shown below the keyword muscles was searched. Looking at the visualisation it should be clear that:
- ‘of’ is the most frequent word one position to the right of muscles
- ‘of’ is approximately four times more frequent than the second most frequent word (‘that’) in this same position relative to the keyword muscles.
- The word ‘the’ occurs more frequently one position to the left of muscles than in any other word-position relative to this keyword.

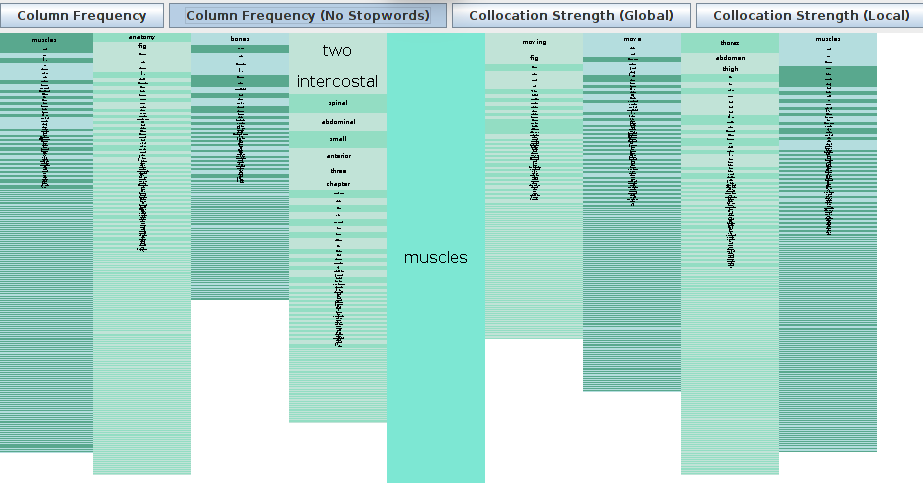
[B] Frequency Mosaic (No Stopwords)
This mode simply removes words which occur with a frequency above a certain threshold. It thus aims to help the researcher by omitting very common ‘stopwords’ such as ‘the’, ‘of’, ‘and’, etc.
The figure below shows the second Mosaic mode for the keyword muscles:
[C] Collocation Strength (Global)
With this third view, the user has the option to scale the height of the word boxes according to one of four ‘collocation strength’ statistics: MI-score, MI3-score, Log-Log and Z-score. This version of the Mosaic can thus help the researcher find out whether an observed collocation pattern is statistically meaningful or whether two words simply co-occur by chance.
All of these statistics compare in different ways the observed frequency of a term co-occurring with the node word, against its expected frequency in the corpus selected. The observed frequency corresponds to the actual number of instances in which these two words co-occur. The expected frequency is the frequency that one would expect if no factor other than random chance were affecting the frequencies. It is therefore calculated as the total word count of the corpus selected divided by the number of individual ‘types’ (the total number of different words).
Which of these scores is most helpful will ultimately depend on the user’s research questions and interests. MI-scores will tend to show more lexically unique collocations, while the other three statistics will tend to emphasise high frequency items. More information on the relative benefits and disadvantages of each of these measures can be found in the literature on using statistics in corpus linguistics: see, for example, Tony McEnery, Richard Xiao & Yukio Tono (2006) Corpus-based Language Studies: An advanced resource book, London & New York: Routledge.
MI-Score: This statistical measure is widely used in corpus linguistics in order to test the significance of a collocation. It is calculated by dividing the observed frequency of the co-occurring word by its expected frequency in the corpus selected, and then taking the logarithm to the base 2 of the result. The higher the MI-score (and, consequently, the greater the height of the word box), the stronger the significance of the collocation.
MI3-Score: MI-scores can be shown to place excessive emphasis on especially rare words, to the detriment of more common terms. The MI3-score is therefore an attempt to re-balance this bias in the MI-score test by giving more weight to high frequency items. It is calculated by cubing the observed frequency, dividing this by its expected frequency in the corpus selected, and then taking the logarithm to the base 2 of the result. Again, the higher the MI3-score (and, consequently, the greater the height of the word box), the stronger the significance of the collocation.
Log-Log: Log-log is another extension of the MI-score test developed in order to address the perceived biases of this calculation by giving more weight to high frequency items. It is calculated by multiplying the MI-score by the log of the number of co-occurrences of the two words, and again the higher the Log-Log score (and, consequently, the greater the height of the word box), the stronger the significance of the collocation.
Z-Score: Finally, Z-scores represent a further means of comparing the observed frequency of a collocate with the frequency expected if only chance were affecting its distribution in the corpus selected. In this case, they are calculated as the number of standard deviations from the mean frequency. As with the other measures, the higher the Z-score (and, consequently, the greater the height of the word box), the stronger the significance of the collocation.
Hovering over a tile with the mouse pointer will display the statistical values according to which its height has been calculated (see screenshot below). Please note, however, that the figures shown for the MI- and MI3-scores are not log transformed because log transformation would have the effect of smoothing over the differences between the relative frequencies of the collocates, rather than foregrounding them. In order to convert these values into ‘true’ MI- and MI3-scores, users should take the log to the base 2 of the figure displayed. For instance, in the example pasted below, we need to take the log to the base 2 of 77627.4 = 16.24428. Online calculators such as OmniCalculator can help users make this conversion: https://www.omnicalculator.com/math/log

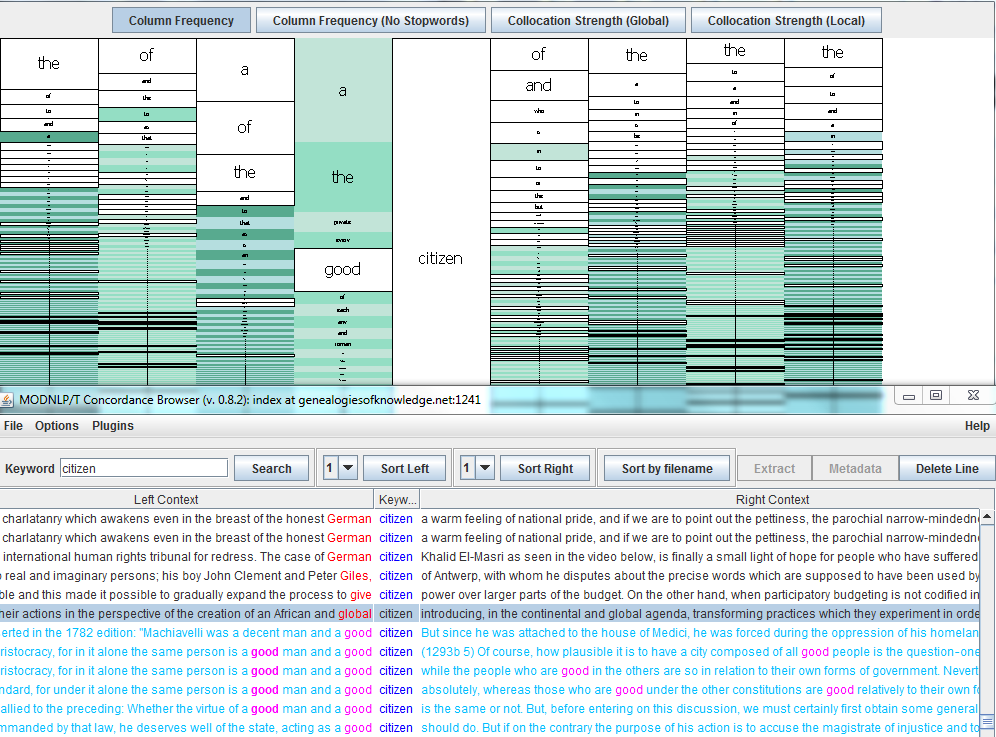
Example
To illustrate the usefulness of this version of the Mosaic with an example, the screenshot below shows the ‘Column Frequency’ Mosaic for collocations of the node word ‘citizenship’ in a subcorpus of English translations of Thucydides. This shows that the words ‘of’, ‘rights’, and ’the’ co-occur most frequently in the word positions to the left of ‘citizenship’:

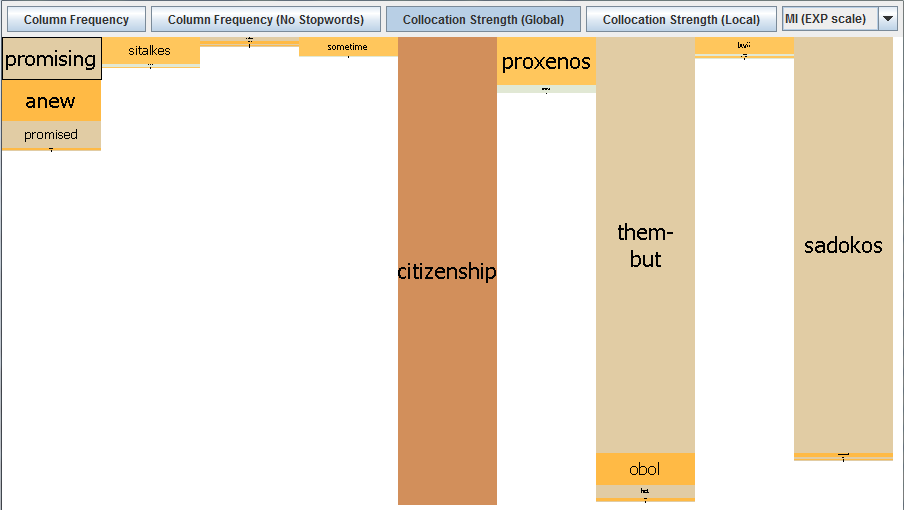
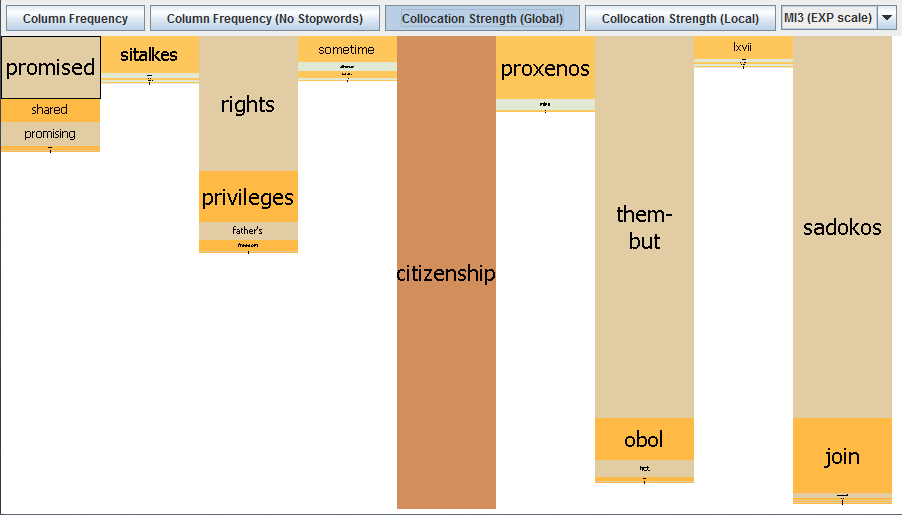
Switching to the ‘collocation strength’ view in its MI-score version gives quite a different picture (see below). As discussed, this measure only shows those collocates that can be shown to co-occur with significantly greater frequency than expected if chance alone were at play. The MI-score does, however, tend to give particular weight to terms which appear only very rarely in the corpus as a whole and highlight them as particularly strong collocates of the node word. Hence, the Greek name ‘Sadokos’ is displayed as a ‘strong’ collocate for ‘citizenship’ in this corpus, four word-positions to its right (MI = 18.37092). This is because it only appears twice in the corpus as a whole, and in one of these instances with citizenship:
Switching to the MI3-score version brings other – potentially more interesting – collocations into the picture, namely, ‘rights’ and ‘privileges’, terms which are used with greater frequency in the corpus selected as a whole (72 and 42 times respectively). ‘Rights’ and ‘privileges’ are calculated as having relatively high MI3-scores (16.24427 and 14.85657 respectively), so the Mosaic would suggest these are statistically significant collocations for ‘citizenship’ in this corpus and that this pattern is worth investigating in further detail:
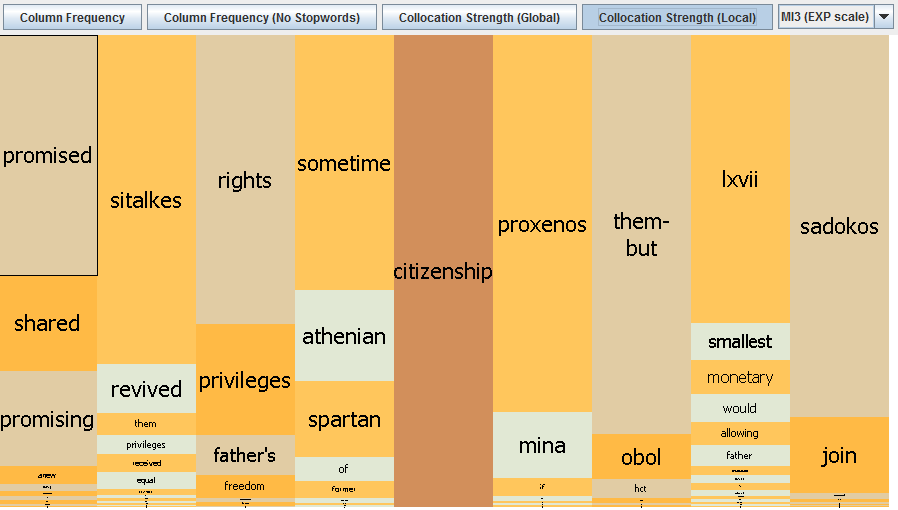
[D] Collocation Strength (Local)
In this last view the collocation strength boxes are scaled up so that each column is full height. This distorts the values so that comparisons across word positions are now invalid. However, this improves the researcher’s ability to inspect the word positions individually and view collocation patterns which would have been too difficult to identify in the global view. In the example pasted below, for instance, we might find this view useful for the way it points to ‘Athenian’ and ‘Spartan’ as potentially interesting collocates, one word-position to the left of ‘citizenship’:
[E] Mosaic Interactions
The Mosaic and the concordance window are linked and interactions with the Mosaic are mirrored in the concordance window. Clicking on a tile in the Mosaic sorts the appropriate column in the concordance window and scrolls to the clicked word where it appears in that position.
All concordance lines containing the clicked word in the relevant position are highlighted in purple. In addition, the clicked word is also highlighted in the concordance where it occurs in positions other than the one selected in the Mosaic. This allows users to capture occurrences of a given collocation, such as ‘good’ + ‘citizen’, within an expanded collocation span, as can be seen in the following screenshot.
Hovering over tiles in the mosaic pops up a tool-tip which displays the word and its collocation frequency in this word-position. In addition the tool-tip also displays the calculated collocation strength statistic when using either of the Collocation Strength views.
Mousing over tiles which are too small to read expands them and a number of tiles around the target.
Right clicking on a context word will attempt to search for concordances of the keyword and the clicked word at the chosen position. Warning: These searches may take a long time to finish.
If you find a tile marked *null*, this simply means that no collocations can be found at this word-position. This is most commonly because the keyword occurs at the very beginning or end of a corpus text.
Concordance Tree
The Concordance Tree builds a tree of either the left or right context of the concordance. The tree is rooted at the keyword and expands outwards, allocating a separate column to each word position. Thus, unlike the Mosaic visualisation, the Concordance Tree maintains the sentence structure within each line, albeit only on one side of the search term at a time.
You can use the scroll function on your mouse to zoom in and out, and click and drag using the hand tool to move the tree around the screen. Clicking on a word expands/collapses the branch of the tree associated with that word.

Metadata Facets Plugin
Once you have generated a concordance, this plugin allows you to see the number of lines associated with a particular facet of the metadata such as source language or publication date, and to filter the concordance based on the attribute you selected. In the example below, the facet selected is ‘Internet Outlet’.

The options you can select from are displayed in a dropdown window next to the Sort by frequency button at the top.

The list of elements displayed in the output of the visualisation is not ordered alphabetically but depends on the order in which the individual items happen to appear in the generated concordance – in the above example, the order reflects the fact that the first set of concordance lines generated come from Discover Society, followed by ROAR_Magazine, etc. The ‘Sort by frequency’ button allows you to reorder the display by the frequency of occurrence of the search term in a particular subset of files
The Metadata Facet Plugin interacts with both the concordance generated and the Mosaic plugin – changes you make in the selection are reflected in both.
Example:
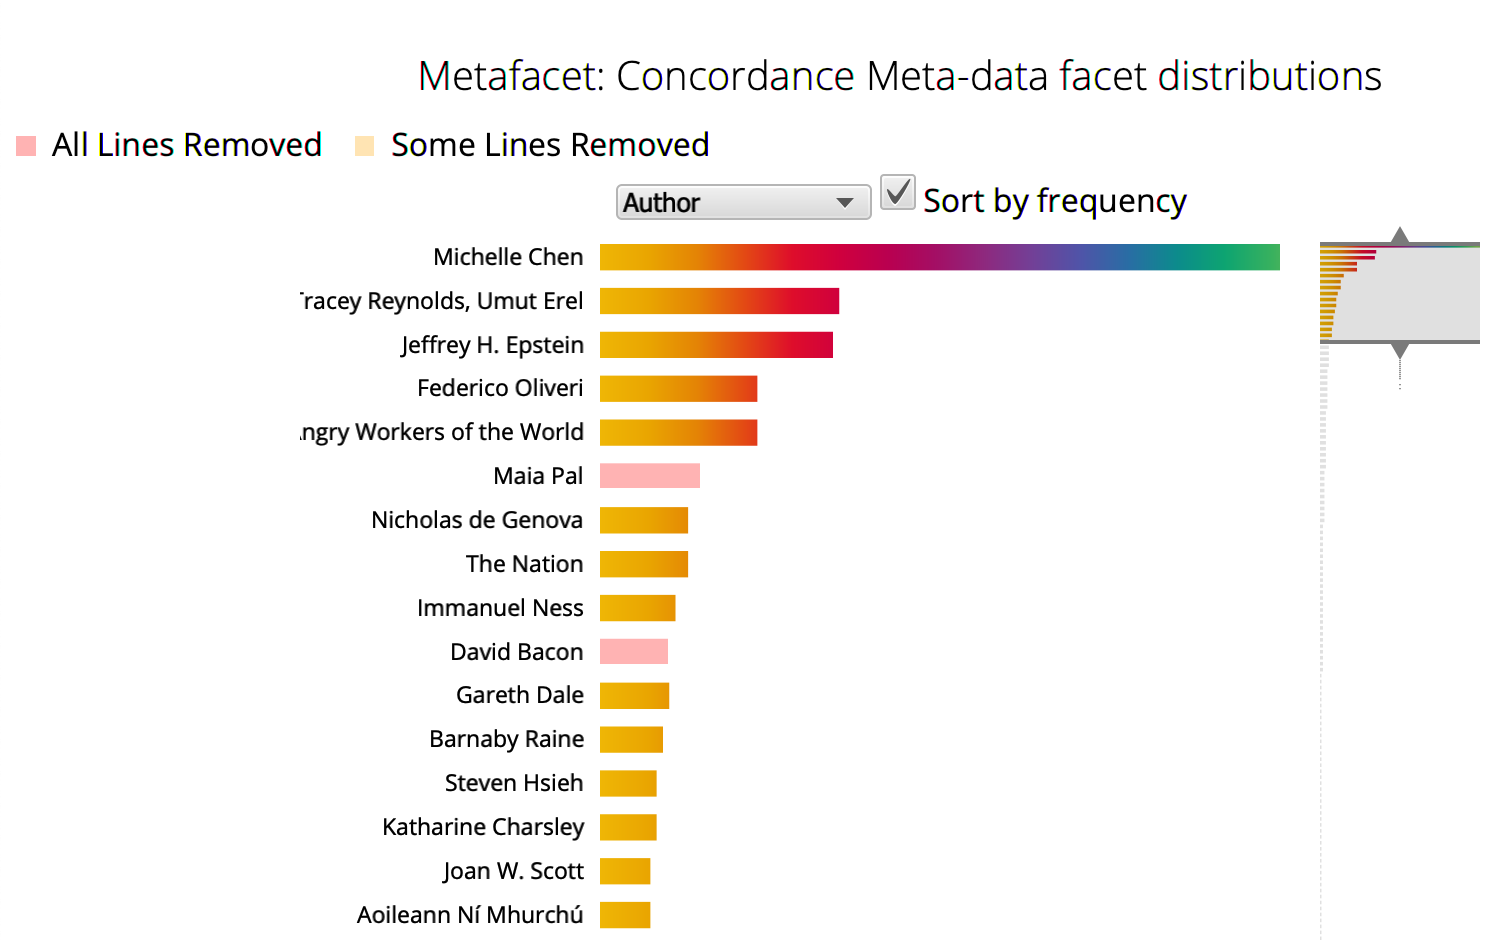
Select a metadata facet such as ‘Translator’ or ‘Filename’, then expand, contract or slide the range view to the right of the screen by moving the arrows up or down. This feature is particularly useful when you select a facet that produces too much noise, as in the case of filenames, or authors: in these cases, sorting by frequency and moving the bar upwards, for example, can allow the user to zoom in on only the top section of the visualisation. Alternatively, the user may be interested in lower rather than high frequency patterns, and moving the top arrow downward would therefore focus the visualisation on those bars at the bottom of the chart.

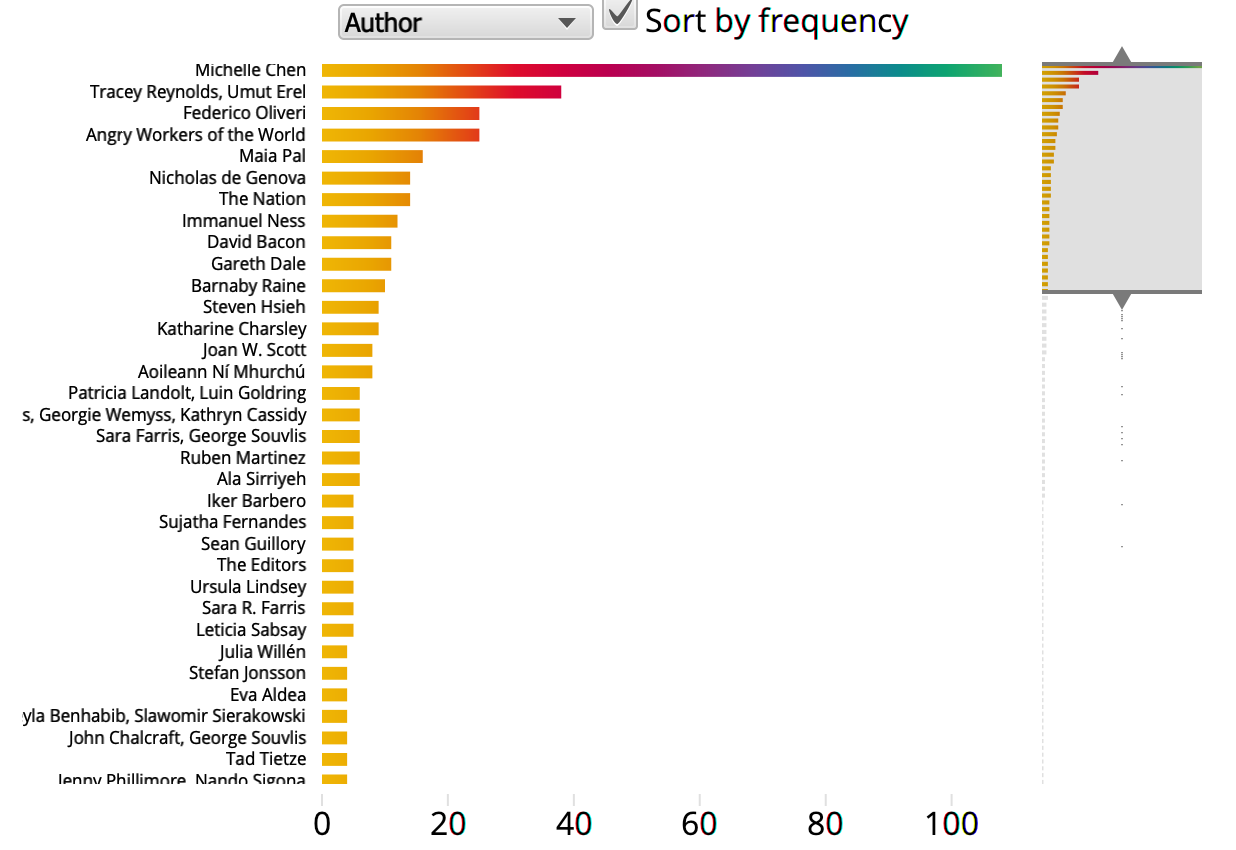
Clicking on a bar will remove the concordance lines associated with the relevant metadata element (e.g. a particular author). The removed bars become pink.
If you remove one of the bars by mistake, clicking on the relevant bar again will reinstitute it (and the associated lines in the concordance).
To select a relevant metadata element (e.g. a particular translator) rather than remove irrelevant ones, use Ctrl+click: this removes all lines but the ones associated with the selected element.

Once you are happy with your new list, click on the ‘Update Bars/Load concordance’ button at the top to refresh the visualisation for the filtered list. This will then discard the previous concordance and take what is currently in the concordance window as the starting point for a new visualisation. The plugin presents the metadata breakdown of this new concordance rather than the original search, allowing you to filter the output further by selecting a different facet (such as range of dates or source language) from the drop-down list.
If you filter the output and then switch the facet according to which the concordance is visualised, the orange/yellow bars will indicate what has already been partially removed from the concordance by another interaction.
In the example below, for instance, the top bar of the graph represents those lines for which the source language is Classical Greek. It is orange/yellow because in a previous interaction with the plugin, in which the concordance was instead categorised by author, those lines associated with a Classical Greek author (e.g. Plato) were removed from the concordance.

Using the Greek corpus
In order to search the Greek corpus, you must enter your query in the Greek script. The browser does not recognise transliterated Greek. Thus, searching for anqrwpos (as one might when using e.g. the Perseus Digital Library or the Thesaurus Linguae Graecae) will not return any results. You must instead enter ανθρωπος in order to obtain the desired results.
As with the search query tools implemented by the Perseus Digital Library and the Thesaurus Linguae Graecae, however, the Genealogies of Knowledge software is not by default sensitive to diacritical marks: searching for ανθρωπος will, in other words, find instances of ἄνθρωπος. In order to have the software distinguish between accented and unaccented letters, please go to ‘Options’ > ‘Case/diacritic sensitive’.
Using the Arabic corpus
As with the Greek corpus, the Arabic corpus must be searched using the Arabic script and not any transliterated form.
Typing in Search Box (Mac OS Platforms)
Typing Arabic in the search box is straightforward in the case of platforms other than Mac OS. Apple users may find that Arabic letters will display unconnected and in reverse order. While somewhat distracting, this will not affect the generation or display of concordances.
Affixes
If you type a lexical item without affixes the search will return all permutations of the item, including affixes, except for conjugation affixes (i.e. those signalling gender, person and tense). So, a search for قل will return
وقال
فقال
قاله
But it will not return
قالت
قالوا
تقول
يقال
If you type a form with a specific affix, the search will return only that form, except for conjunctions (such as و and ف). So if you type قالت, the search will not return قالوا or يقال, but it will return:
قالت
فقالت
وقالت
Note: no tokeniser is perfect, and all languages have polysemous items. You should therefore expect some search items to be misinterpreted by the software. For example, a search for the verb دل will return both ودل (conjunction و plus verb دل) as well as the noun بدل, misinterpreted by the tokeniser as preposition ب + noun/verb دل).
Wildcards
As with the subcorpora in other languages, the asterisk (*) may be used to represent any string of characters of any length, either at the beginning or end of an item. For example, searching for *قال will retrieve a concordance containing all words starting with that form:
قال
قالت
قالوا
قالوه
For users of Mac OS, the * should be typed at the beginning not end of the search word, which, as explained earlier, will appear as disjointed letters in reverse order. Similarly, to retrieve a concordance of all items ending in قال, Apple users should place the * at the end not the beginning of the search word.
Frequency List and Other Plug-ins
The output of the frequency list plug-in and other tools such as Mosaic is based on the same principles of tokenisation outlined above. Hence, the number of concordance lines returned for a search item is its corpus count and should be the same as the figure that appears against it in the frequency list.